Microsoft Word has been around for so long that there’s not much you can’t do in this powerful program. Did you know it was first introduced on the Mac way back in January 18, 1985? Since Microsoft’s Windows has been such a competitor to the Mac system, Microsoft’s presence on the Mac has been hotly debated for many years. At this point, however, things seem to have settled down, so there’s no shame in running Microsoft software on your Mac, nor running Apple software on your PC!
Because Word has been around for so long, however, it’s kind of the kitchen sink of word processing programs with super powerful indexing software, a formatting language of its own, cloud storage capabilities,a built-in language translator, drawing tools, shared document revision tracking, even an embedded programming language! Suffice to say, yes, you can make a pretty table.
Let’s jump in. For this I’ll set up a basic table to track my Starbucks beverage purchases because, well, because I’m sitting at Starbucks as I write this!
First step is to jump to the Insert ribbon. Notice the second entry from the left is “Table”:

Click on Table and a tiny window pops up with a big empty grid and a few text choices:

In the above, I’ve dragged my cursor to select a three column x four row table. Don’t worry if you guess wrong, it’s super easy to add new rows or columns once you start filling in the table. A click and this shows up in my document:

I typed in “Let’s add a table!” in case you’re wondering. But notice on the top left there’s a floating “+”. That lets you drag and move the table to the correct spot in your document at any point. The lower right is even more interesting: That tiny box lets you click and drag to resize the table, with everything else flowing and resizing as needed. Later we’ll make the table a bit narrower to look better, but for now, let’s enter some basic data:

I told you, it’s a basic table of Starbucks drink experiences!
You can change the text or background color of any cell, or, by clicking and dragging to select multiple, any row or column. Let’s do that for the top row. First, though, click on “Table Design” to get the design ribbon:

See the tiny paint bucket to the right of all the basic grid formats? That’s “Shading“. Click and drag your cursor to select everything in a given row, then click on Shading in the top ribbon:

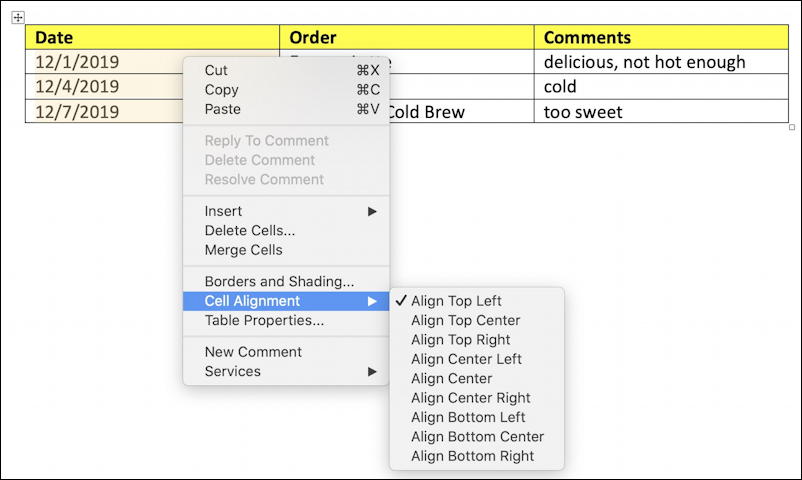
My document theme (I didn’t even know I had a document theme!) has a color scheme, but I’m going to just choose yellow from the standard colors along the bottom. And BOOM! The top row is now yellow. While I’m at it, I want to change the alignment of the dates so that each date is centered in the column. That’s easily done by selecting all the cells in the column, then using Control-Click to access the many “Cell Alignment” choices:

I’ll choose “Align Center” so it’s centered both horizontally and vertically. In other words, exactly centered in the cell.
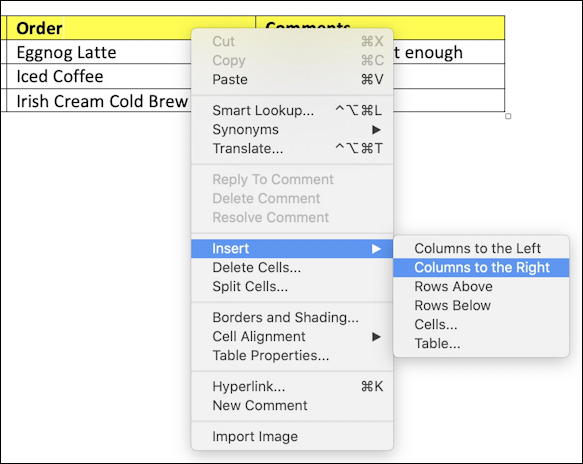
All good, but now I want to add a column between Order and Comments that lets me keep track of cost too. Again, easily done. Choose a cell on either side and Control-Click to bring up the menu, but this time choose “Insert“:

Since I picked a cell from the Order column, I want to add a “Column to the Right”. A click and that’s done too, ready to fill in with data. Here’s where we are:

Two more things and we’ll call it a wrap: First, a click and drag on the tiny box on the lower right lets me narrow the table, and clicking and dragging again to choose every cell (or use the shortcut: click on the “+” element) and then “Align Center” and the final table is attractive and professional both:

There’s even more you can do with tables but I hope this’ll get you started taming the wild table and getting it to work just so for your needs. Word really is super powerful!
Pro Tip: I’ve been writing about the Mac since the beginning of the system. Please check out my very extensive Mac help archive, with hundreds of useful tutorials and how-to articles. Thanks!
The post How Can I Format a Table in Microsoft Word? originally appeared on Ask Dave Taylor.